Cannot be combined with any other offer. Details in participating stores or at rona.ca. Enhance lighting equipment at home or in the workplace with powerful photocell controls from Rona. Some models are motion-activated to accommodate arriving guests, or discourage vandals or burglars.
Practical timers are ideal to automatically turn lights on and off at different times in the day or night. Look forpower strips to keep photocell light controlsrunning steadily, and protected from power surges. Save on electricity with photocell timers to power an apartment or a house more efficiently. Some models come with a switch for remote operation. Connect compatible thermostats and wireless sensors to WiFi and create profiles for easy installation. Update the firmware and easily create photo galleries for ColorTouch thermostats.
Photocell Controls (
The Venstar ColorTouch T7850 is a good option if you are ready to upgrade your thermostat. It's attractive and easy to navigate. Easily pair the new VenNet Temperature/Humidity sensor to compatible thermostats with the push of a button. Please sign in to your account to take advantage of your online discounts.
Offer valid from November 24, 2022 to February 1st, 2023 in participating stores and at rona.ca . Save an additional 15% on select clearance major appliances. Excludes previous purchases, parts and accessories. Applicable only on merchandise purchased in store and paid in cash, debit or credit card. Doesn’t apply to previous purchases and layaways.
To make the dish healthier, I usually add some spinach and carrots. I pressure cook the carrots with the lentils. Then I saute the spinach in the tempering pan until it wilts. Then add the cooked dal. Secure the Instant pot with lid, with the steam release handle set to sealing position. Pressure cook for 9 to 10 mins and wait for natural release.
Mix and cook for about a minute over low heat. Then add 3 tbsp of water or as required to make a slightly moist filling. 2.Heat the pan put the coarsely ground dal and add the spices. In West Bengal and Bangladesh, a kachori has a quite different variation. In West Bengal, kachori is softer and smaller. It is made mostly of white flour and asafoetida , which are often added to make it extremely tasty.
Ingredients (US cup = 240ml )
Add a bit of dough to check if it rises. Roll into a small disc. Place the stuffing ball and bring the edges together to seal. Editor's pick on the best recipes, articles and videos. Help us delete comments that do not follow these guidelines by marking them offensive.
“With the winter setting in, it’s that time of the year when warm soups and a hot cup of hot chocolate is soothing as ever. So here I am sharing another simple recipe. It is healthy, it is nutritious and it is also yummy! Great for kids and for grown up too,” she wrote in the caption as she shared the video. Pour oil or ghee to the steel insert and press the sautebutton. When the oil turns slightly hot, add cumin seeds & curry leaves orbay leaf, followed by ginger, green chilies and onions.
Rajma Recipe, How to Make Rajma Masala
Moong dal is a simple, delicious & healthy Indian lentil side made with skinned mung lentils & spices. This recipe will give you a very flavorful dish that you can serve with plain rice, roti or with any flat breads. Instructions for instant pot and stove top included. We usually do not make very hot & spicy lentils as the original flavor of lentils is lost. However if you love spicy foods, then feel free to double the amount of spices like red chilli powder & garam masala. Remove this and pour over the cooked moong dal.
Break pieces of dough and roll into walnut sized rounds. Roll these flat into 1/4 inch rounds and pinch about 1/2 of the edge all around, leaving the centre thicker. Kachori is one of the most popular tea-time snacks. Roasted besan absorbs all moisture from moong dal. While stuffing kachoris, make sure you close the stuffing nicely.
cocktail samosa recipe | party samosa recipe with samosa sheets
Add coconut and tamarind to the sautéed dal mixture for a southern flavour. Easy to store, these kachoris can be made and eaten for a few days. Just remember to keep in an air-tight container. These dal kachoris are variants of the traditional dal kachoris. Instead of deep-fry, they are baked, for lower Moong Dal Kachori Calories. Filled with dals and other spices, they have a good amount of protein and carbs.
Add a little water to avoid masalas from burning. In a pan heat 3/4th tablespoon of oil. Add cumin seeds , fennel seeds and crushed coriander seeds, allow it to crackle.
street-style moong dal kachori
The stuffing can vary from lentils to vegetables. Today’s post is a guest post, by my dear friend and an amazing home chef, Ujjaini Majumdar. Kota Kachori from Rajasthan is probably the most famous kachori in the state. The Pyaaj Kachori is also very popular.
You shall get even better results. Cook on a medium flame for 4 to 5 minutes or till the moong dal is lightly browned, while stirring continuously. Check the seasoning at this stage or else you will get bland kachori.
Updated and republished in May 2022. Saute until the onions turn lightly pink or golden, add chopped tomatoes. For best results follow my detailed step-by-step photo instructions and tips above the recipe card.
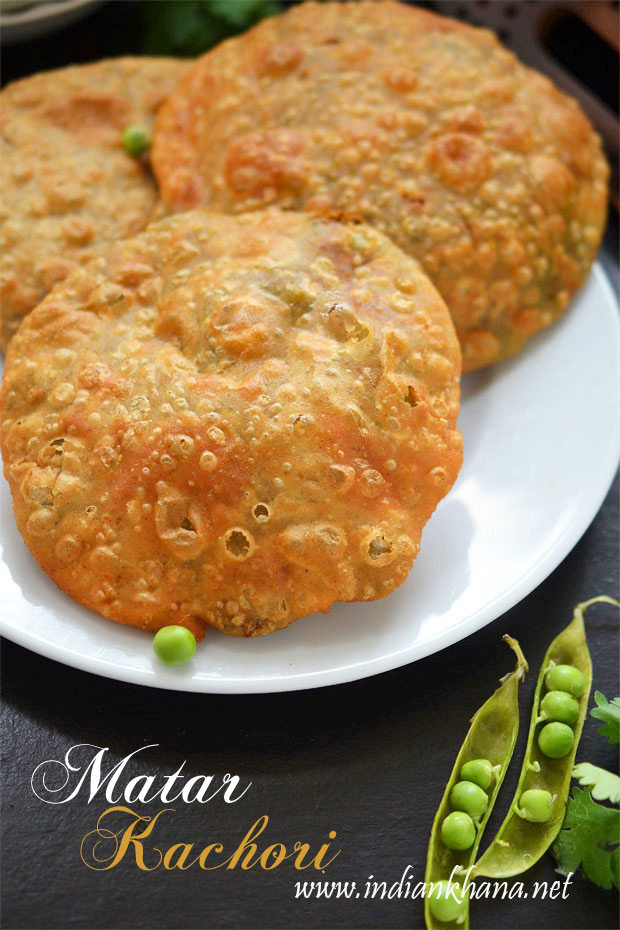
If cooking in a pot, pour more hot water as required and cook uncovered until the lentils are soft. Pour 1 tablespoon oil to a pressure cooker or pot. When the oil becomes slightly hot, add cumin seeds. When the seeds splutter, add ginger, green chilies and 4 to 5 curry leaves. Moong dal kachori is popular street food in India, made during the festival season. It is deep-fried round kachori stuffed with moong dal and spices.
how to make moong dal kachori with step by step photo:
And then add urad dal in enough water for 3 to 4 hours or overnight, then completely drain the water. Blend the dal in a grinder jar. Treat yourself to a cheat day and enjoy the eclectic flavours of this extraordinary and appetizing urad dal kachori. Find the recipe down below. When moong dal is puffed up, drain water and grind it into a slightly coarse mixture.
Additionally, make sure to fry on a really low flame to cook uniformly. Start to pleat and seal tight. Pinch off excess dough.
Making kachori takes time and you need to make the outer crust dough and the lentil stuffing. I hope with my detailed step by step guide you will be able to make perfect kachori. In the recipe I have used organic all-purpose flour , but you can use a mix of both all purpose flour and whole wheat flour. The recipe is adapted from myUrad Dal Kachori that I had posted some months back.
Cover the dough with a damp muslin cloth and keep aside for 15 to 20 minutes. Cover the dough with a wet muslin cloth and keep aside for 15 minutes. Nehas Cook Book Gujarati is all about Gujarati veg recipes.
They do an amazing job for the soil and thus, can improve plant growth. Are you interested to know how to grow peat moss? You’ll be surprised to know they are easy to grow. In this guide, I will tell you more about peat moss and give you tips in making them.
Now with all of that being said, how do you make a moss pole for climbing vines? Carefully arrange the plant around the pole, encouraging the aerial roots to wrap around the pole. Encouraging the aerial roots to wrap around the pole. I came home to my beautiful Monstera on the floor one day because it had no support.
Controversy in Using Peat Moss
You want your pole to be tall enough for your plant to climb but not too tall that it becomes top-heavy and falls over. If you’re repotting your plant, this is a perfect time to use a deeper pot that will allow for the taller moss pole. This is where ‘moss sticks or moss poles' come in. These assist epiphyte plants in gaining the height they need and also add a level of sophistication and beauty to your garden. You don't necessarily have to buy some of the expensive ones off the shelf; you can make them yourself. In some cases, the suction cup isn’t to blame for the struggles you’re facing.
It gives the plant support around which it can entwine itself and grow upwards. Before you rush to your local home improvement store to pick up a new set, we’ve rounded up some tips to help. Here are some of our favorite tricks for making suction cups stick. Even though your task may be done for now but you still have daily maintenance on your to-do list. The most important of which is to mist the sphagnum moss to encourage aerial roots to grow higher and adapt better to it. Place the plant somewhere where there is enough sun but no harsh or direct sunlight.
Having trouble making suction cups stick? Try these four home hacks.
Ratings and prices are accurate and items are in stock as of time of publication. Remove the tape and place the pole into your pot as close to the center as possible without damaging the root system too much. Tape off the area of the pole you are using that will be submerged into the pot. I used an old 4 ft. broomstick we had in the garage.
Keep adding moss down the length of the pole, securing it with string. Leave the bottom 6-12 inches of the stake with no moss. PVC pipes are lightweight but strong enough to support heavy plants.
What is Peat Moss?
CEC affects the soil’s structure stability, pH level and nutrient availability. The height and thickness of the staking material will be influenced by the size of plant you would like to train to climb. Shorter and thinner stakes are ideal for smaller plants while larger diameter and taller stakes are great for supporting larger Monstera and Philodendron plants. Very plant parent knows the wonders and woes of nurturing a patch of green on the balcony. But often, due to lack of steady support or space, the greens begin drooping downwards.
Typically, peat bogs grow less than a millimeter per year. While the process to grow peat moss takes time, the resulting product is worth the wait because of its many benefits. This moss support is essential to keep your plants moist and straight. Both options for making it work very well and have given excellent results. To finish, cut the excess thread and place the plant in the pot. To do this, follow the same steps as the first option.
DIY Moss Pole Step-By-Step Instructions with Pictures
Also, ensure that as you're watering that the water reaches below ground level and percolates nicely into the soil. Finally, try repotting every 2 and a half to three years, to keep the plant thriving beautifully. Start wrapping the jute rope around the pipe using glue to fasten it. Leave the bottom one-third free as this is the part of the pole that will be implanted in the soil. Another benefit to adding a moss pole to your plant is that moss will ensure budding roots stay perfectly moist – not too wet and not too dry.
Some of the best-known species that do this are monsteras, pothos, anthuriums, orchids, and climbing vines. While making your own moss pole may seem to be an intimidating project, it’s easy and fun! We’ll show you the steps to creating moss poles for a few different houseplants. Follow along to make your own and soon you’ll have a shelf filled with climbing plants. Many tropical houseplants, including Monstera, Philodendron, Pothos, and Scindapsus are considered epiphytes.
In the short term, I let it lean on this armchair. This climbing plant with large leaves definitely needed some support. If you are growing Monstera deliciosa then at some point you are going to want to purchase or make a moss pole.
If you run out of string while adding moss, cut another piece and continue where you left off. If your plant is small, leave 6 inches with no moss. Squeeze the soaked moss to drain excess liquid and set it aside. The moist moss will supply water to your plant’s vines. The reason you’re tying the twine on first is to hold it in place as your wrap it around the moss in the next step.
Take a relatively thick and durable wooden stake which will act as the backbone of your moss stick. Surround it with a single layer of wire mesh which is held together with something strong like wooden staples. Plant this assembly snugly into the pot where you intend to grow your climbers and cover the base with a layer of soil. If you are a gardener, you might have already heard about peat moss.
So when someone enters your precious garden space, they aren't just panning left to right like any old regular space but also up and down in complete marvel. Find a clump of live sphagnum moss in your garden. They don’t maintain the humidity that the roots need. Therefore, the plant will not seek to climb there. Here we serve you the best and informative gardening ideas, creative DIY's and limited space gardening tips and tricks.
If you have petroleum jelly lying around your house, you have what it takes to make this home hack happen. All you have to do is dab a little petroleum jelly into the cup and hold it in place wherever you’re attempting to stick it. Misting the pole is supposed to help the roots gravitate to the pole so I have been doing that as well. However, you can also use a few soft plant ties to attach the stem of the plant to the pole for more support.
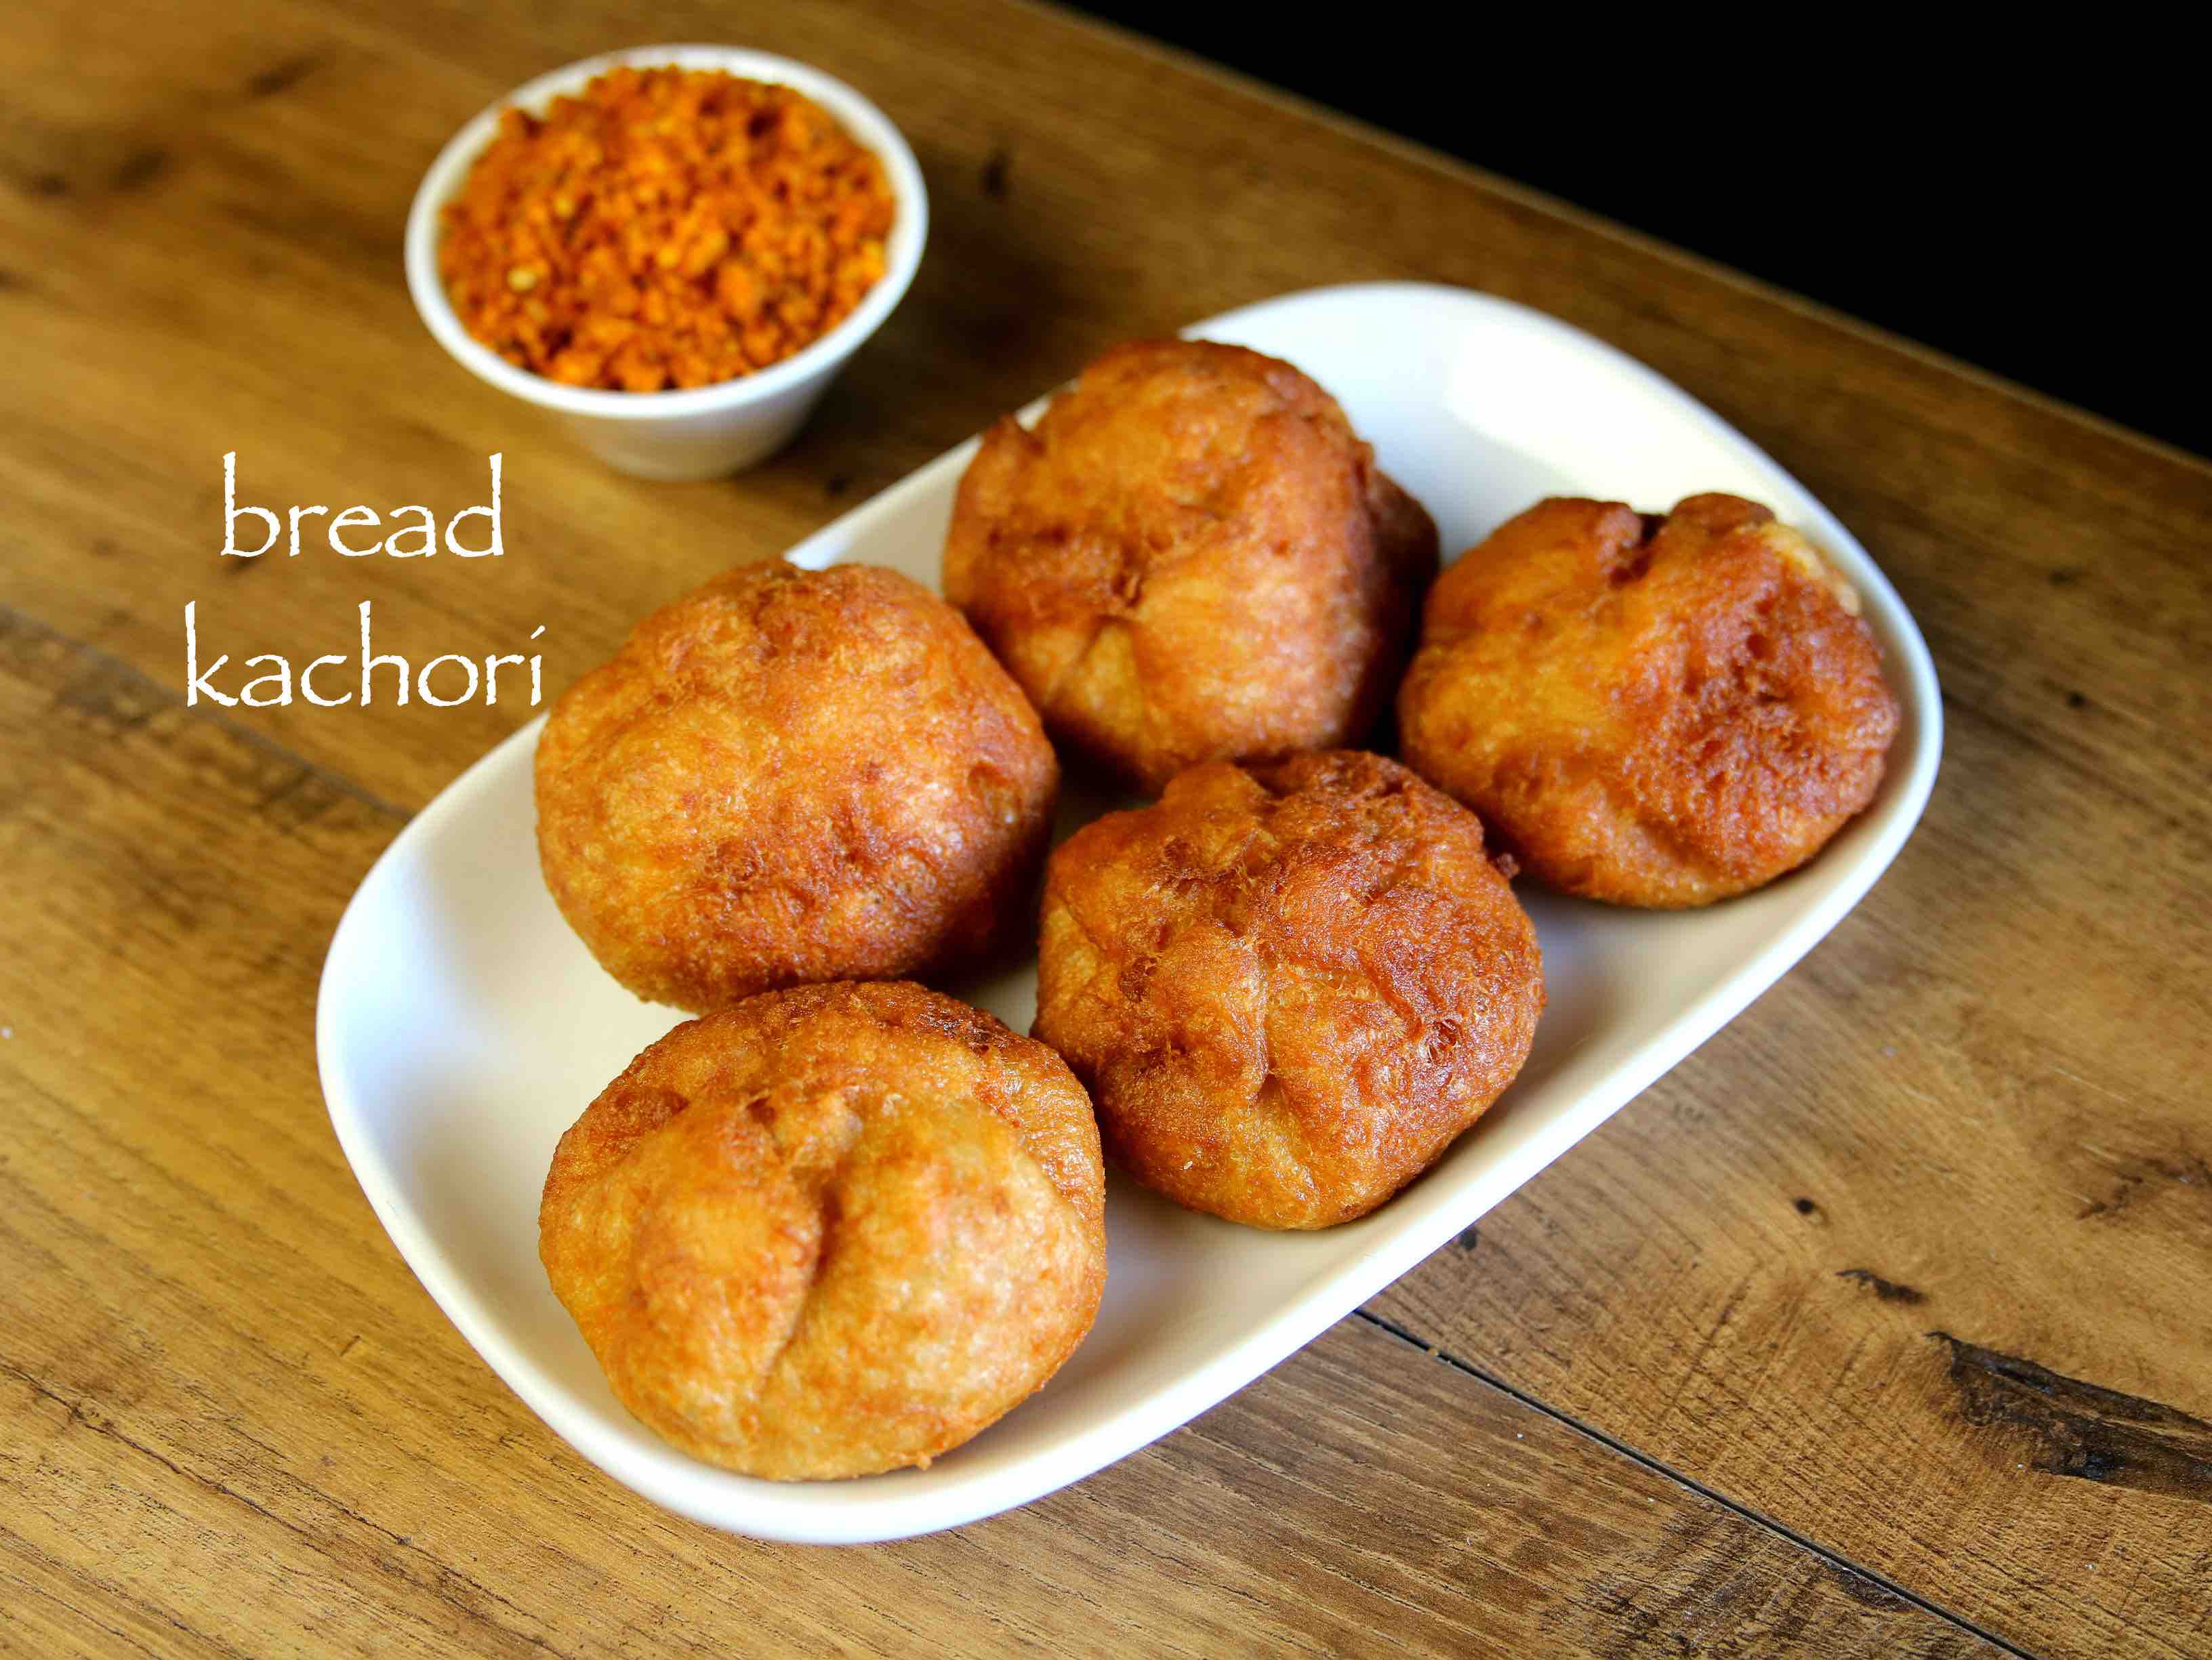
Kachori is a flaky, crispy deep-fried snack with stuffing filled with the cover of a dough made of maida . Many types of kachoris are made in Indian cuisine, and the filler may vary from lentils to vegetables and even dry fruits. Moong Dal Kachori is one of the most popular and loved kachori, also known as Khasta kachori. Kachori, a popular Indian deep-fried snack is a flaky pastry stuffed with spicy moong dal filling. Learn how to make some lip-smackingly delicious kachoris with this step-by-step recipe. Cover and pressure cook for 4 to 5 whistles on a medium flame.
Add a little water to avoid masalas from burning. In a pan heat 3/4th tablespoon of oil. Add cumin seeds , fennel seeds and crushed coriander seeds, allow it to crackle.
Eggless Chocolate Cake Recipe
It turns thick upon cooling. Pour 2 cups water. Stir well with a spatula to deglaze the bottom. Take one part of the dough and with your fingers flatten the edges and make into 3-inch circle.
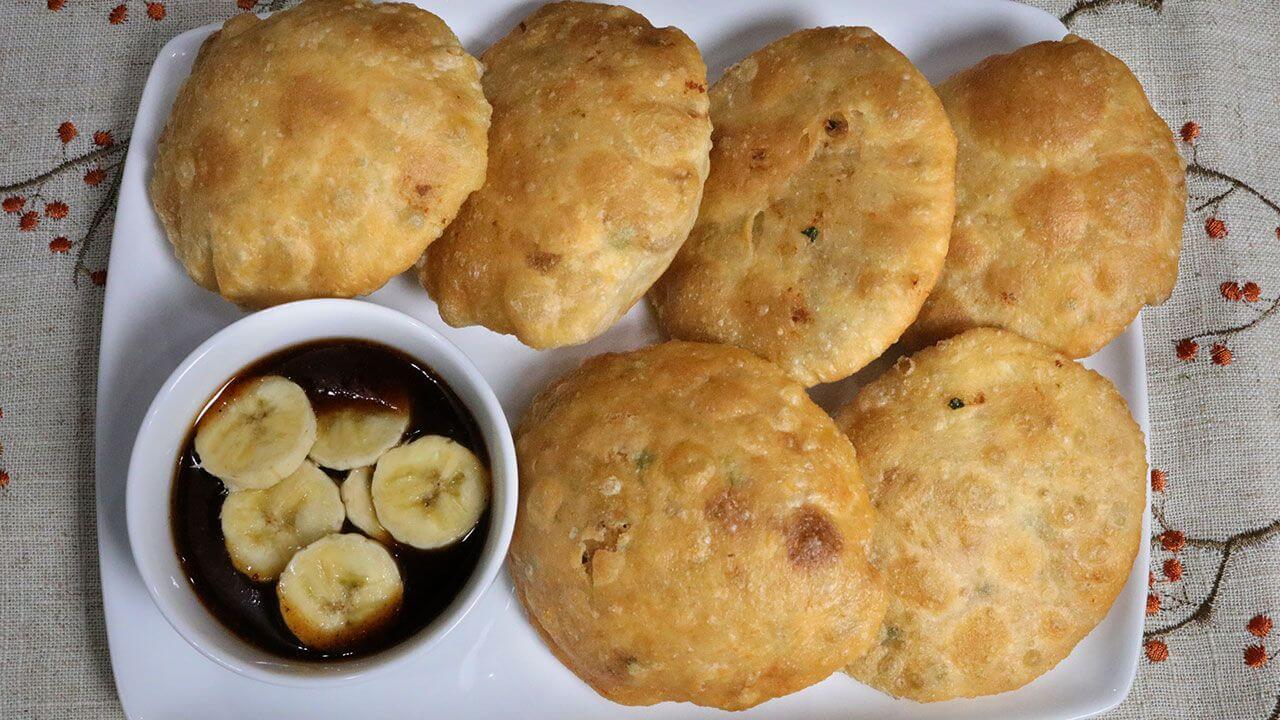
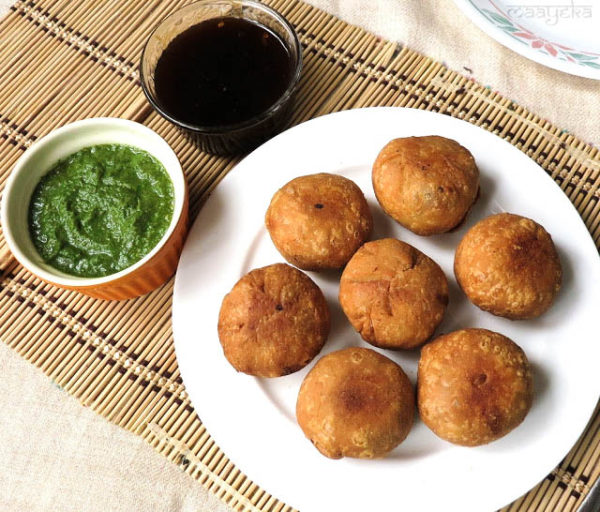
Mix thoroughly with a spoon. Then stir in some desi ghee to combine the dough. Add water in portions and knead a soft dough. Crusty moong dal kachoris are ready. Serve kachoris with green coriander chutney or sweet chutney or you can even eat them as it, as these have very appetizing taste. Have coffee or any other beverage, you'll surely relish eating these.
Keep the flame to its lowest and mix very well. Do make sure that the spices do not burn. Fry the kachoris till they become golden and nicely crisp from outside. When the kachoris start puffing up, then gently nudge each kachori with a spoon, so that they puff up well. You have to mix well, till you get a breadcrumb like texture in the flour. When this mixture is pressed, it should not break.
Then you got to try my recipes. You will be surprised at how a simple lentil dish can taste so good, bursting with flavors. Both kinds of split moong dal (with & without skin) can be used in most preparations. They can also be used interchangeably if you are okay with the color of the dish. So using split moong dal with skin is the same as using the whole green gram except for the cooking time. For filling of the kachori, rinse urad dal several times before soaking.
top 5 curd benefits | diy home remedies with curd – health & beauty
Repeat the step with all the kachoris and serve moong ki dal ki kachori hot immediately with green chutney and tamarind chutney. This is one of the best moong dal kachori recipes. Moong dal kachori recipe
Your moong dal is ready at this stage and you may serve it right away or do a tadka like the way I did. If you want serve it right away without tadka, add some chopped coriander leaves and squeeze lemon juice while serving. When the pressure drops, open the lid and mix well. I did not have to add any more water.
Nirav Modi loses appeal against extradition to India in UK Supreme Court
This will depend on the number of moong dal mixture balls that were made. Take a portion of the cut dough and flatten it with your fingers. Keep the edges thin while flattening. You can also use a rolling pin to flatten.
Now, we will fry the kachoris. Preheat oil for deep frying the kachoris. Mix the flour, salt and oil in a mixing bowl. Rub oil and flour between fingers to get bread crumb like texture. Add chilled water slowly, mixing with your fingers as you pour to make the kachori dough.
Additionally, make sure to fry on a really low flame to cook uniformly. Start to pleat and seal tight. Pinch off excess dough.
Continue to fry on a low to low-medium flame till they become golden. Flatten the top and then gently roll the kachori with a rolling pin to get a medium thickness kachori. Stuff and prepare all kachori this way.
Rajasthani moong dal kachori
After 30 minutes, lightly knead the dough. Then roll the dough into a log. Drain the kachoris over the kitchen towel to remove excess oil. Pinch a lemon size dough, roll it into a ball, and flatten it.
Add water as required and knead to a smooth and soft dough. Now place the moong dal stuffing ball on the dough. Flatten the moong dal stuffing ball. Continue to fry on a low to low-medium flame till the kachoris become golden. While frying you can turn them often to get an even color.